How to Connect Listmonk to Any Tool via MCP
Connect Listmonk to Claude Desktop, VS Code, and Cursor via MCP in 15 minutes. Full setup with uvx, API tokens, health checks, and 18 ready-to-use MCP tools.

Edward Chalupa
Founder, Whtnxt · Dallas, TX

I ran Listmonk in production for six months and 43 campaigns before I connected it to an AI assistant. The manual path worked: log in, click through subscribers, build a campaign, paste the template, schedule the send. Each one cost me 12 to 18 minutes of clicking. The n8n pipeline I built cut that to zero, but it still had a gap. When someone asked “how many subscribers are on the Houston list?” or “add these 5 emails to the onboarding flow,” I either opened the dashboard or edited a workflow. There was no middle ground.
The Model Context Protocol (MCP) server for Listmonk closes that gap. One config block in Claude Desktop, VS Code, or Cursor, and the assistant can check health, add subscribers, create lists, pull campaigns, and manage templates with plain language. No dashboard clicks, no workflow edits for one-off asks. I tested this across my own Listmonk instance and it works. Here is exactly how I set it up, including the two pitfalls that cost me 20 minutes each.
What You’re Building
An MCP server that bridges an AI assistant to the Listmonk REST API. The server is a small Python process that exposes Listmonk operations as 18 MCP tools. Your assistant talks to those tools over the MCP protocol, and the tools call Listmonk on your behalf using an API token.
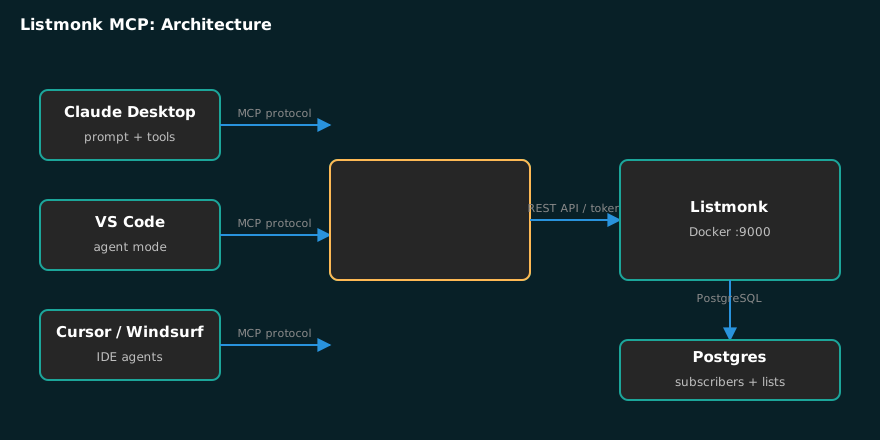
The architecture is three layers: your assistant (Claude Desktop, VS Code, Cursor, Windsurf), the listmonk-mcp server running locally, and your Listmonk instance with its API and Postgres database. The assistant never touches your database directly, and Listmonk never sees your assistant. The MCP server is the only authenticated bridge.
Info: MCP is the open standard Anthropic released in late 2024 for connecting assistants to external tools and data, documented at modelcontextprotocol.io{target=“_blank”}. If you need the broader picture before diving in, I wrote a full breakdown in MCP Servers for Marketers. This post is the practical setup.
What You’ll Need
| Requirement | Details |
|---|---|
| Listmonk instance | Running v3.0+, with API access enabled |
| Python | 3.11+ (the MCP server requires it) |
| uv or uvx | The recommended installer, or use pip |
| API user and token | Created in Listmonk Admin > Users |
| MCP-capable client | Claude Desktop, VS Code, Cursor, or Windsurf |
| 15 minutes | Total setup time, once Listmonk is running |
If you do not have Listmonk running yet, the official Listmonk repo{target=“_blank”} has a one-command Docker Compose setup. I cover the full self-hosted stack in Automate Listmonk Campaigns with n8n and the email-specific build in Automated Email Marketing with n8n and Listmonk. Both assume you can get a Listmonk instance up on a $6 VPS.
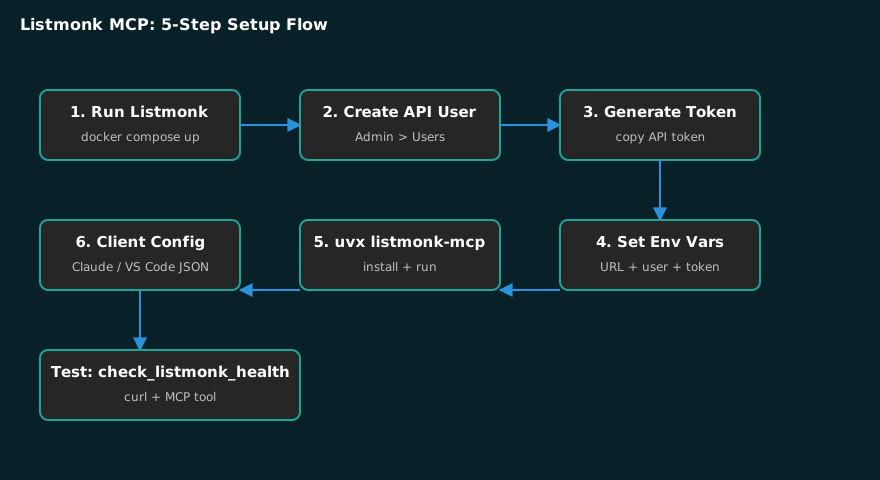
Step 1: Run Listmonk (If You Do Not Have It)
For a local test, the project ships a Docker Compose file. From the repo directory:
docker compose -f docs/listmonk-docker-compose.yml up -dOr pull the official compose file directly:
curl -LO https://github.com/knadh/listmonk/raw/master/docker-compose.yml
docker compose up -d
Listmonk comes up on port 9000. Default credentials are admin / listmonk. You will be forced to change the admin password on first login. The database (Postgres) runs in a second container, so the full stack is two containers.
Tip: If you already run Listmonk in production, skip this step entirely. The MCP server works against any reachable Listmonk instance, local or remote. Mine runs on a $15 Digital Ocean droplet alongside n8n, and the MCP server connects to it over the network.
Step 2: Create the API User and Token
The MCP server does not use your admin login password. It uses a dedicated API user with a generated token. This is the single most important detail in this post, and the README is explicit about it.
- Log into the Listmonk admin interface at
http://localhost:9000/admin - Go to Admin > Users
- Click “Add new” and create a user, for example
api-user - Save the user, then click into it
- Click “Generate API token” and copy the token
The token is a long string. Treat it like a password. Listmonk expects it in the Authorization: token <username>:<token> format, which the MCP server builds for you.
Warning: The
LISTMONK_MCP_PASSWORDenvironment variable holds the API token, NOT the user’s login password. If you put your login password there, every call fails with “invalid session” or a 403. I burned 20 minutes on exactly this on my first setup because the variable name says password.
Step 3: Set the Environment Variables
The MCP server reads three required variables plus a few optional ones:
export LISTMONK_MCP_URL=http://localhost:9000
export LISTMONK_MCP_USERNAME=api-user
export LISTMONK_MCP_PASSWORD=your-generated-api-token
Optional settings:
export LISTMONK_MCP_TIMEOUT=30
export LISTMONK_MCP_MAX_RETRIES=3
export LISTMONK_MCP_LOG_LEVEL=INFO| Variable | Purpose | Default |
|---|---|---|
LISTMONK_MCP_URL | Your Listmonk server URL | required |
LISTMONK_MCP_USERNAME | API user created in Admin > Users | required |
LISTMONK_MCP_PASSWORD | API token, not the login password | required |
LISTMONK_MCP_TIMEOUT | Request timeout in seconds | 30 |
LISTMONK_MCP_MAX_RETRIES | Retry count for failed calls | 3 |
Verify the credentials work before you wire up the assistant. The server uses the same token auth as Listmonk’s API, so a curl health check tells you everything:
curl -H "Authorization: token api-user:your-generated-api-token" \
  http://localhost:9000/api/health
A 200 with {"data": true} means the URL, user, and token are all correct. A 401 means the token is wrong. A connection refused means Listmonk is not running or you have the wrong port. I spent another 20 minutes on a port mismatch when Listmonk was bound to 9000 in Docker but I was hitting 8080.
Info: If you prefer an all-in-one deployment, the project also ships a Docker setup (documented in the Listmonk MCP docs{target=“_blank”}) that runs the MCP server as a container next to Listmonk. I use the local process approach because I want the assistant on my laptop talking to a remote server.
Step 4: Install and Run the MCP Server
The server is published to PyPI as listmonk-mcp{target=“_blank”}. The recommended install uses uvx, which downloads and runs it without polluting your Python environment:
# Run directly (installs if needed)
uvx listmonk-mcp --help

# Or install globally
uvx install listmonk-mcp
listmonk-mcp --help
If you prefer pip:
pip install listmonk-mcpYou can verify the server starts and prints its version:
listmonk-mcp --versionWarning: If
uvxis not on your PATH, installuvfirst withpip install uv, or use the pip route. On my Ubuntu box, a fresh shell did not see uvx until I added the uv binary directory to PATH.
Step 5: Connect Claude Desktop
Claude Desktop is the fastest client to test with because it reloads MCP servers on restart. Edit your config file:
- macOS:
~/Library/Application Support/Claude/claude_desktop_config.json - Windows:
%APPDATA%\Claude\claude_desktop_config.json - Linux:
~/.config/Claude/claude_desktop_config.json
Add the server block:
{
  "mcpServers": {
    "listmonk": {
      "command": "uvx",
      "args": ["listmonk-mcp"],
      "env": {
        "LISTMONK_MCP_URL": "http://localhost:9000",
        "LISTMONK_MCP_USERNAME": "api-user",
        "LISTMONK_MCP_PASSWORD": "your-generated-api-token"
      }
    }
  }
}
Restart Claude Desktop completely, not just the window. In the chat, ask something simple:
“Check the Listmonk server health.”
If the server connected, you will see the listmonk tools available (the tools icon or the hammer-and-wrench indicator in the UI), and Claude will call check_listmonk_health and report the result. If you see “no MCP tools found,” the config JSON has a syntax error or the server failed to start. Check the env values first.
This is the same pattern I used for Postiz MCP with Claude Desktop, and it is the fastest way to test any MCP server: one JSON block, restart, ask.
Step 6: Connect VS Code, Cursor, and Windsurf
VS Code uses the same server, configured in user settings rather than a separate file. Add to ~/.config/Code/User/settings.json:
{
  "mcp": {
    "servers": {
      "listmonk": {
        "command": "uvx",
        "args": ["listmonk-mcp"],
        "env": {
          "LISTMONK_MCP_URL": "http://localhost:9000",
          "LISTMONK_MCP_USERNAME": "api-user",
          "LISTMONK_MCP_PASSWORD": "your-generated-api-token"
        }
      }
    }
  }
}
Reload the VS Code window (Command Palette > Developer: Reload Window), then open the MCP panel to confirm the server shows as running. Cursor and Windsurf follow the same shape with their own settings files, and Cline has a dedicated config page in the MCP server docs{target=“_blank”}.
Tip: One server, four clients. You do not install separate MCP servers per tool. The same
uvx listmonk-mcpprocess serves any MCP-capable client, so once the env vars are right, the JSON block is copy-paste.
Step 7: Do Something Real
The server exposes 18 tools. The ones I use weekly: check_listmonk_health, add_subscriber, update_subscriber, list_subscribers, get_mailing_lists, create_mailing_list, get_campaigns, and the template tools. Here is what a real session looks like.
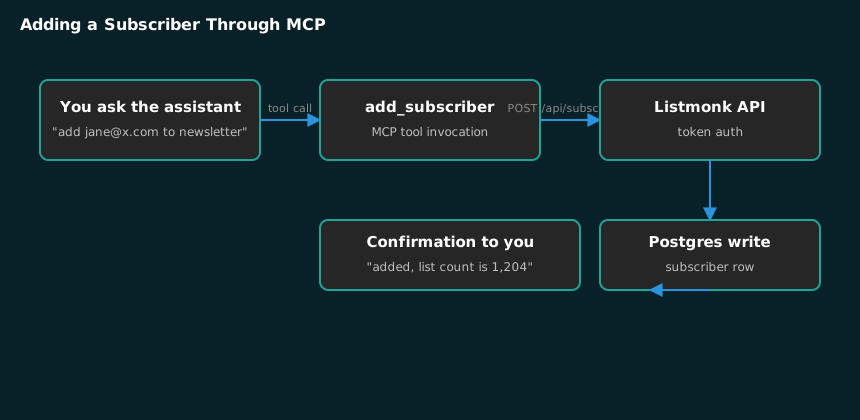
Add a subscriber:
“Add jane@example.com to the newsletter list.”
The assistant calls add_subscriber with the email and list ID, Listmonk writes the row to Postgres, and the assistant confirms. The whole exchange takes seconds.
Pull a campaign list:
“What campaigns went out in the last 30 days and what were their click rates?”
The assistant calls get_campaigns, reads the stats from the JSON, and summarizes. This replaced the dashboard tab I used to keep open, and it feeds the same data I otherwise push into the Listmonk analytics dashboard. When you need the same visibility across every channel, not just email, the marketing analytics dashboards I build for clients pull Listmonk, n8n, and ad platforms into one view.
Create a list:
“Create a list called ‘Q3 leads’ with the tag ‘organic’.”
That maps to create_mailing_list, and the new list is ready for imports immediately. For bulk subscriber imports from a CSV or a CRM export, I still reach for the n8n pipeline in Automate Listmonk Campaigns with n8n, because scheduled, repeatable imports belong in a workflow, not in a chat. For one-off adds, fixes, and reports, MCP is faster than both the dashboard and n8n. If you are turning raw inbound leads into subscribers, this is the subscriber side of a lead generation system: capture, clean, route, and nurture on one self-hosted stack.
The Pitfalls I Hit
Three problems cost me real time, and all three are documented here so you skip them.
- API token vs login password. The
LISTMONK_MCP_PASSWORDvariable takes the generated API token, not the user’s login password. Wrong value, every call returns “invalid session” or 403. Verify with the curl health check in Step 3 before touching client config. - Port mismatch. Listmonk in Docker listens on 9000, but my first compose file mapped it to 8080 on the host. The MCP server connected to nothing and the error said connection refused. Check
docker psfor the actual host port mapping, then setLISTMONK_MCP_URLto match. - Client restart is mandatory. Editing the Claude Desktop config JSON does nothing until the app fully restarts. On Linux, I had to quit the process entirely; a window close was not enough. Same for VS Code: use Developer: Reload Window, not a tab reload.
When to Use This (And When Not To)
Use the MCP server when you need conversational access to Listmonk: ad-hoc subscriber adds, list lookups, campaign checks, template edits, and answers to “what is the state of our email program” questions. It is also the right choice when you want an assistant to act on your Listmonk data as part of a larger agent workflow, because the 18 tools give the assistant real operations, not just read access.
Do not use it as your primary automation engine. Scheduled campaign sends, bulk imports of thousands of subscribers, deduplication runs, and anything that must fire at 6 AM on a timer belong in n8n. My marketing automation engine handles the scheduled layer, and the MCP server handles the interactive layer. They complement each other: n8n runs the pipeline, MCP answers the questions about it.
Warning: The MCP server gets write access to your Listmonk data. Give the API user the minimum role your workflow needs, and never put the MCP config in a shared repo with real tokens. Use a
.envfile or your client’s secret storage. This is production email infrastructure, not a toy.
What’s Next
The natural next step is to point the same assistant at your campaign analytics and let it explain performance instead of just listing it. I built a Listmonk campaign analytics dashboard with n8n that tracks the same data, and pairing the dashboard with the MCP tools gives you both the scheduled report and the on-demand answers.
If you want the full picture of where MCP fits in a marketing stack, start with MCP Servers for Marketers, then come back here and wire up your own Listmonk instance. If your email program needs the scheduled automation layer too, I have written up the exact n8n setup in Automate Listmonk Campaigns with n8n. When you want this built for your business, including custom MCP servers and marketing automation services, get in touch and I will show you what the stack looks like for your email program.